协议
HTTP 方法
- GET:请求指定资源,获取数据。参数附加在URL后,长度有限制,不适合传输敏感信息
- POST:向指定资源提交数据,通常用于表单提交。参数放在请求体中,无长度限制
- PUT:向指定资源上传数据,通常用于更新资源的全部内容
- DELETE:删除指定资源
- HEAD:类似于GET请求,但只返回响应头,不返回响应体。用于检查资源是否存在或获取元数据
常见状态码(200、301、302、404、500): 2xx表示成功,3xx表示重定向,4xx表示客户端引发的错误,5xx表示服务器端引发的错误
RESTful 风格
- 资源(Resource):通过URL表示资源,如
/users表示用户资源 - HTTP 方法:使用不同的HTTP方法操作资源,如GET获取资源,POST创建资源,PUT更新资源,DELETE删除资源
- 无状态(Stateless):每个请求都应包含所有必要的信息,服务器不应存储客户端的状态
- 统一接口(Uniform Interface):通过标准化的接口与资源进行交互,如使用JSON或XML格式进行数据交换
请求协议
- 请求行、请求头
目标主机名、浏览器版本、接受的文件类型
1
2
3
4
| GET /index.html HTTP/1.1 // 第一行为请求行
Host: www.example.com
User-Agent: Mozilla/5.0
Accept: text/html
|
- 请求体
与请求头之间有一个空行分隔。
只有POST请求才会携带请求体,包含提交的数据,大小无限制
1
2
3
4
5
6
7
| @RestController // 将controller的返回值作为响应体返回
public class PostController {
@PostMapping("/submit")
public String handleSubmit(@RequestBody String body) {
return "Received data: " + body;
}
}
|
响应协议
1
2
3
| HTTP/1.1 200 OK
Content-Type: text/html
Content-Length: 1234
|
URL 组成
协议(Protocol):如 http、https
域名(Domain):如 www.example.com
路径(Path):如 /index.html
查询参数(Query):如 ?id=123&name=abc
端口(Port):如 :80(HTTP默认端口)、:443(HTTPS默认端口)
锚点(Fragment):如 #section1
 1
 2
 3
 4
 5
 6
 7
 8
 9
10
11
12
13
14
15
16
17
18
19
| @RestController
// 方式一:Spring提供的ResponseEntity类
public class ResponseController {
@GetMapping("/data")
public ResponseEntity<String> getData() {
HttpHeaders headers = new HttpHeaders();
headers.add("Custom-Header", "CustomValue");
return ResponseEntity.status(HttpStatus.OK).headers(headers).body("Response Body");// 通常只手动设置响应体
}
}
// 方式二:使用HttpServletResponse对象
public class ResponseController {
@GetMapping("/data")
public void getData(HttpServletResponse response) throws IOException {
response.setHeader("Custom-Header", "CustomValue");
response.setStatus(HttpServletResponse.SC_OK);
response.getWriter().write("Response Body");
}
}
|
Web前端
HTML 基础
基本结构示例:
 1
 2
 3
 4
 5
 6
 7
 8
 9
10
11
| <!DOCTYPE html>
<html lang="en">
<head>
<meta charset="UTF-8">
<meta name="viewport" content="width=device-width, initial-scale=1.0">
<title>Document</title>
</head>
<body>
</body>
</html>
|
标签不区分大小写,属性值用单双引号均可
常用标签
- 标题标签:
<h1>到<h6> - 段落标签:
<p> - 链接标签:
<a href="https://example.com" target="_blank">Example</a>
链接地址使用href属性,打开方式使用target属性(_blank新窗口打开,_self当前窗口打开) - 图像标签:
<img src="image.jpg" alt="Description">
图像地址使用src属性,alt属性用于图像无法显示时的替代文本 - 列表标签:
<ul>、<ol>、<li> - 表格标签:
<table>、<tr>、<td>、<th> - 表单标签:
<form>、<input>、<textarea>
CSS
- 内联样式:使用
style属性直接在HTML标签中定义样式 - 内部样式表:使用
<style>标签在HTML文档的<head>部分定义样式 - 外部样式表:使用
<link>标签链接外部CSS文件
1
2
| <link rel="stylesheet" href="styles.css">
</code>
|
CSS选择器
- 元素选择器:选择所有指定的元素,例如
p选择所有段落 - 类选择器:选择所有指定类的元素,例如
.className选择所有类名为className的元素 - ID选择器:选择指定ID的元素,例如
#idName选择ID为idName的元素 - 属性选择器:选择具有指定属性的元素,例如
[type="text"]选择所有type属性为text的输入框
1
2
3
4
| p {font-size: 16px;}
[class="highlight"] {color: red;}
#header {background-color: blue;}
[type="text"] {background-color: lightyellow;}
|
JavaScript 基础
- 引入方式
1
| <script src="script.js"></script>
|
- JSON格式:
 1
 2
 3
 4
 5
 6
 7
 8
 9
10
| {
"name": "John",
"age": 30,
"isStudent": false,
"courses": ["Math", "Science"],
"address": {
"street": "123 Main St",
"city": "Anytown"
}
}
|
- DOM(文档对象模型)
是HTML和XML文档的JS编程接口。它将文档表示为一个树结构,其中每个节点表示文档的一部分(例如元素、属性或文本)。
- 访问节点:通过
document对象访问文档中的元素,例如document.getElementById()、document.querySelector('选择器')。 - 修改节点:可以更改节点的内容、属性或样式,例如
element.innerHTML、element.style。 - 事件处理:可以为节点添加事件监听器,例如
element.addEventListener("click", function)。 - 创建和删除节点:可以动态添加或移除文档中的元素,例如
document.createElement()、parentNode.appendChild()、parentNode.removeChild()。
1
| document.getElementById("myElement").innerText = "Hello, World!";
|
- 事件监听
1
2
3
| document.getElementById("myButton").addEventListener("click", function() {
alert("Button clicked!");
});
|
常见事件类型:
- 鼠标事件:click、dblclick、mouseenter、mouseleave
- 键盘事件:keydown键盘按下、keyup键盘抬起、keypress
- 表单事件:submit表单提交、change值改变、focus获得焦点、blur失去焦点
Vue
Vue 是一个用于构建用户界面的渐进式 JavaScript 框架。它的核心库专注于视图层,易于上手,并与其他库或现有项目轻松集成。
Element组件网址:https://element-plus.org/
- 项目管理命令
- 创建项目:
npm init vue@latest - 安装依赖:
npm install - 运行项目:
npm run dev
- 基础格式
 1
 2
 3
 4
 5
 6
 7
 8
 9
10
11
12
13
14
| <script src="https://unpkg.com/vue@3/dist/vue.global.js"></script>
<div id="app">
{{ message }}
</div>
<script>
const app = Vue.createApp({
data() {
return {
message: 'Hello Vue!'
}
}
});
app.mount('#app');// 将 Vue 应用挂载到具有 id "app" 的 DOM 元素上
</script>
|
- 常用函数
v-for: 列表渲染v-bind: 动态绑定 HTML 属性v-model: 创建双向数据绑定v-if / v-else-if / v-else: 条件渲染(是否创建)v-show: 条件显示(创建后选择是否显示)v-on: 事件监听
- 生命周期钩子函数
created: 实例创建后调用mounted: 实例挂载到 DOM 后调用updated: 数据更新后调用
VueRouter
Vue Router 是 Vue.js 的官方路由管理器,定义路径与组件之间的对应关系。
- :请求链接组件,浏览器会解析成
- :动态视图组件,用来渲染展示与路由路径对应的组件
AJAX
在不重新加载整个网页的情况下,与服务器交换数据并更新部分网页内容。
基本使用示例:
1
2
3
4
5
6
7
8
| <script src="https://unpkg.com/axios/dist/axios.min.js"></script>
axios.get('https://api.example.com/data')
.then(function (response) {// then异步处理成功回调
console.log(response.data);
})
.catch(function (error) {
console.error('Error fetching data:', error);
});
|
async/await 语法:
将异步代码变成同步
1
2
3
4
5
6
7
8
9
| async function fetchData() {
try {
const response = await axios.get('https://api.example.com/data');// await 等待异步操作完成
console.log(response.data);
} catch (error) {
console.error('Error fetching data:', error);
}
}
fetchData();
|
Web后端
分层解耦
三层架构:控制层Controller(响应前端请求)、业务逻辑层Service(具体处理逻辑)、数据访问层Dao(数据库)
IOC(控制反转) DI(依赖注入)
IOC 将对象的创建和依赖关系的管理交给容器,而不是由对象自身;IOC容器中管理的对象称为 Bean。
DI 通过构造器注入、属性注入或接口注入将依赖关系传递给对象。
1
2
3
4
5
6
7
8
9
| @Component // 将类标记为Spring管理的IOC组件
public class UserService {
private final UserRepository userRepository;// 不用显式指定对象类名,会自动查找各实现类
@Autowired // 通过构造器注入依赖
public UserService(UserRepository userRepository) {
this.userRepository = userRepository;
}
}
|
- @Autowired按类型注入。
若有多个实现类,对实现类添加@Primary注解指定首选实现类;在@Autowired添加@Qualifier()元注解指定具体实现类。 - @Resource(name=“beanName”)按名称注入。
Maven
Maven 是一个项目管理和构建自动化工具,主要用于 Java 项目。它使用 pom.xml 文件来管理项目的构建、依赖和文档。
 1
 2
 3
 4
 5
 6
 7
 8
 9
10
11
12
13
| my-app
├── pom.xml // 项目对象模型文件,包含项目信息和配置
└── src // 源代码目录
├── main
│ ├── java
│ │ └── com
│ │ └── mycompany
│ │ └── app
│ │ └── App.java
│ └── resources // 资源文件目录
└── test // 测试代码目录
├── java
└── resources
|
- 生命周期
分为三套周期:clean、default、site
同一套生命周期中,运行某个阶段会自动执行该阶段之前的所有阶段。
clean 阶段:clean: 清理上一次构建生成的文件
default 阶段:validate: 验证项目是否正确且所有必要信息是否可用compile: 编译项目的源代码test: 运行测试package: 将编译后的代码打包成可分发格式
JAR 普通模块(内嵌tomcat);WAR Web模块; POM 聚合模块(只用于管理依赖)install: 将包安装到本地 Maven 仓库deploy: 将最终包复制到远程仓库
site 阶段:site: 生成项目的站点文档
继承与聚合
- 继承与聚合的pom.xml文件打包方式均为pom,不生成实际的jar/war包。两者可以共存在同一个pom文件中。
- 聚合与继承均属于设计型模块,并无实际的模块内容
继承
用于简化依赖配置、统一管理依赖。
在父项目中配置共有的依赖,子项目在其 pom.xml 中使用 <parent> 标签指定父项目。
1
2
3
4
5
6
7
| 子项目的pom.xml
<parent>
<groupId>com.example</groupId>
<artifactId>my-parent</artifactId>
<version>1.0-SNAPSHOT</version>
<relativePath>../pom.xml</relativePath>
</parent>
|
对于一些依赖,只在部分子项目中使用。
因此父项目中不直接引入这些依赖,而是通过 <dependencyManagement> 标签统一管理版本,并未直接引入。
此时子项目只需声明依赖而不指定版本号。
 1
 2
 3
 4
 5
 6
 7
 8
 9
10
11
12
13
14
15
16
17
18
19
20
| 父项目的pom.xml
<dependencyManagement>
<!-- 指定了依赖的版本号,但没有引入依赖 -->
<dependencies>
<dependency>
<groupId>org.springframework.boot</groupId>
<artifactId>spring-boot-starter-web</artifactId>
<version>2.5.4</version>
</dependency>
</dependencies>
</dependencyManagement>
子项目的pom.xml
<dependencies>
<dependency>
<groupId>org.springframework.boot</groupId>
<artifactId>spring-boot-starter-web</artifactId>
<!-- 版本号由父项目管理,无需指定 -->
</dependency>
</dependencies>
|
聚合
将多个模块组织成一个整体,统一进行项目的编译、打包、安装等构建操作。
- 聚合工程:一个不具有业务功能的“空”工程(有且仅有一个pom文件) 【PS:一般来说,继承关系中的父工程与聚合关系中的聚合工程是同一个】
1
2
3
4
5
| 聚合工程的pom.xml
<modules>
<module>module-a</module>
<module>module-b</module>
</modules>
|
Spring Boot
Spring Boot 是一个用于简化 Spring 应用程序开发的框架。它通过自动配置和约定优于配置的原则,使开发者能够快速创建独立、生产级别的 Spring 应用程序。
基础概念
常用注解:
@SpringBootApplication: 标记主类,启用自动配置和组件扫描@RestController: 标记控制器类,返回 JSON 或 XML 响应@GetMapping、@PostMapping: 处理 GET 和 POST 请求@Service: 标记服务类,包含业务逻辑@Repository: 标记数据访问类,处理数据库操作@Autowired: 自动注入依赖的 Bean
1
2
3
4
5
6
| @SpringBootApplication // 标记主类,启用自动配置和组件扫描,项目运行入口
public class MyApplication {
public static void main(String[] args) {
SpringApplication.run(MyApplication.class, args);
}
}
|
配置文件
Spring Boot 使用 application.properties(优先级最高) 或 application.yml 文件对应用的配置进行管理。
在启动程序下拉栏的“Edit Configurations…”中可以设置系统属性(-Dserver.port=9000)和命令行参数(–server.port=9001)。
1
2
3
4
| server.port=8081 // 设置服务器端口
spring.datasource.url=jdbc:mysql://localhost:3306/dbname // 数据库连接URL
spring.datasource.username=root // 数据库用户名
spring.datasource.password=your_password // 数据库密码
|
yml中,冒号后必须有空格;缩进表示层级关系,空格个数不限,但同层级必须统一。
1
2
3
4
5
6
7
| server:
port: 8081 // 设置服务器端口
spring:
datasource:
url: jdbc:mysql://localhost:3306/dbname // 数据库连接URL
username: root // 数据库用户名
password: your_password // 数据库密码
|
全局异常处理
 1
 2
 3
 4
 5
 6
 7
 8
 9
10
| @RestControllerAdvice //表示当前类是全局异常处理器
//相当于@ControllerAdvice + @ResponseBody,将异常处理方法返回值转换为json后响应给前端
public class GlobalExceptionHandler {
//处理异常
@ExceptionHandler
public Result ex(Exception e){//方法形参中指定能够处理的异常类型
e.printStackTrace();//打印堆栈中的异常信息
return Result.error("对不起,操作失败,请联系管理员");//捕获异常后使用result类进行响应
}
}
|
Bean 组件
使用 注解@Component 以及它的三个衍生注解(@Controller、@Service、@Repository)来声明IOC容器中的bean对象。
- 作用域:
Spring中的bean默认是单例的(singleton),可以通过注解@Scope设置作用域。
singleton(单例,默认值):IOC容器中只创建一个共享的Bean实例
prototype(原型):每次请求都会创建一个新的Bean实例
request:每个HTTP请求创建一个新的Bean实例(仅适用于Web应用)
session:每个HTTP会话创建一个新的Bean实例(仅适用于Web应用)
application:在ServletContext范围内创建一个Bean实例(仅适用于Web应用)
- 第三方Bean
使用注解 @Configuration 和 @Bean 来定义和注册第三方类的Bean。
 1
 2
 3
 4
 5
 6
 7
 8
 9
10
11
12
| @Configuration // 标记当前类为配置类,集中管理Bean定义
public class MyConfig {
@Bean
public MyThirdPartyService1 myThirdPartyService1() {
return new MyThirdPartyService1();
}
@Bean
public MyThirdPartyService2 myThirdPartyService2() {
return new MyThirdPartyService2();
}
}
|
自定义starter
将某个技术的依赖 + 配置 + Bean 的自动注入全部封装起来,用户只需引入对应的 starter 坐标就能开箱即用。
创建一个新的 Maven 项目,命名为 exp-spring-boot-starter,只包含pom.xml。
在 pom.xml 中添加所需的依赖和插件,并引入第二点的自动配置模块。
创建自动配置module,并编写自动配置类
1
2
3
4
5
6
7
8
| @Configuration
public class MyAutoConf {
@Bean
@ConditionalOnMissingBean // 当容器中没有指定类型的Bean时,才创建该Bean
public MyService myService() {
return new MyService();
}
}
|
- 在
src/main/resources/META-INF/spring.factories 文件中注册自动配置类
1
2
| org.springframework.boot.autoconfigure.EnableAutoConfiguration=\
com.example.autoconfiguration.MyAutoConf
|
- 使用:在配置文件中引入依赖
exp-spring-boot-starter,即可在项目中直接 @Autowired 使用。
1
2
| @Autowired
private MyService myService;
|
*导入第三方依赖Bean
- 使用 @ComponentScan 扫描指定包路径下的类并注册为Bean。(使用繁琐、性能低)
- 使用 @Import 导入普通类或配置类或对应的实现类。
1
2
3
4
5
6
7
8
9
| import org.springframework.context.annotation.Import;
@Import(MyConfig.class) // 导入配置类
@SpringBootApplication // 主类
public class MyApplication {
public static void main(String[] args) {
SpringApplication.run(MyApplication.class, args);
}
}
|
- 使用第三方依赖提供的 @Enable 开启特定功能并注册相关Bean。
1
2
3
4
5
6
7
8
9
| import org.springframework.context.annotation.EnableAspectJAutoProxy;
@EnableAspectJAutoProxy // 开启AOP功能
@SpringBootApplication // 主类
public class MyApplication {
public static void main(String[] args) {
SpringApplication.run(MyApplication.class, args);
}
}
|
MySQL
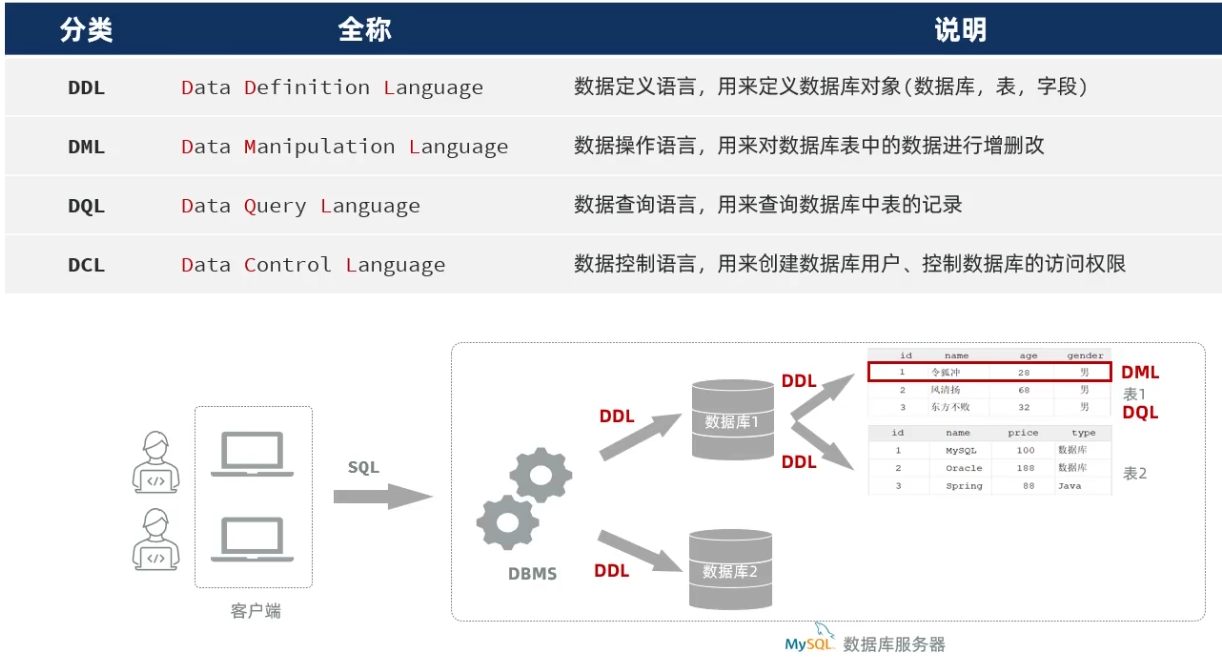
DDL(数据定义语言)
数据库:
- 查询数据库:
SHOW DATABASES;
查询当前使用的数据库:SELECT DATABASE(); - 创建数据库:
CREATE DATABASE dbname; - 删除数据库:
DROP DATABASE dbname; - 使用数据库:
USE dbname;
表:
- 创建表:
CREATE TABLE tablename (column1_name datatype 约束, column2_name datatype, ...); - 删除表:
DROP TABLE tablename; - 查看建表指令:
SHOW CREATE TABLE tablename; - 查看表结构:
DESCRIBE tablename; 或 SHOW COLUMNS FROM tablename; - 修改表:
ALTER TABLE tablename ADD column_name datatype;(添加列)
ALTER TABLE tablename DROP COLUMN column_name;(删除列)
ALTER TABLE tablename MODIFY COLUMN column_name new_datatype;(修改列数据类型) - 修改表名:
RENAME TABLE old_tablename TO new_tablename; - 删除表:
DROP TABLE tablename;
示例:
1
2
3
4
5
6
| CREATE TABLE users (
id INT PRIMARY KEY AUTO_INCREMENT comment '用户ID自增',
username VARCHAR(50) NOT NULL,
email VARCHAR(100) NOT NULL,
created_at TIMESTAMP DEFAULT CURRENT_TIMESTAMP
) comment='用户表';
|
DML(数据操作语言)
- 插入数据:
INSERT INTO tablename (column1, column2, ...) VALUES (value1, value2, ...),(value1, value2, ...); - 更新数据:
UPDATE tablename SET column1 = value1, column2 = value2, ... WHERE condition; - 删除数据:
DELETE FROM tablename WHERE condition;
DQL(数据查询语言)
基本查询:SELECT column1, column2, ... FROM tablename;
通配符*表示查询所有列
为查询字段设置别名:SELECT column AS alias FROM tablename;
去重:SELECT DISTINCT column FROM tablename;
条件查询:SELECT * FROM tablename WHERE column = value;
范围查询:SELECT * FROM tablename WHERE column BETWEEN value1 AND value2;
in查询:SELECT * FROM tablename WHERE column IN (value1, value2, ...);
like模糊查询:SELECT * FROM tablename WHERE column LIKE 'pattern';
pattern中%表示任意字符序列,_表示单个任意字符
分组查询:SELECT column, COUNT(*) FROM tablename GROUP BY column;
HAVING 子句总是出现在GROUP BY之后,用于过滤分组后的结果,是唯一可以在过滤条件中使用聚合函数(如 COUNT(), SUM(), AVG(), MAX(), MIN())的子句
例:SELECT salary, COUNT(*) FROM users where salary > 3000 group by salary having COUNT(*) > 2;
查询工资高于3000且人数超过2人的工资情况。
排序查询:SELECT * FROM tablename ORDER BY column ASC|DESC;
分页查询:SELECT * FROM tablename LIMIT offset, row_count;
执行顺序:FROM -> WHERE -> GROUP BY -> HAVING -> SELECT -> ORDER BY -> LIMIT
选取表 -> 过滤行 -> 分组 -> 过滤组 -> 选择列 -> 排序 -> 分页
JDBC
Java Database Connectivity 是用于连接和操作关系型数据库的API,是其它 ORM 框架(如 Hibernate、MyBatis)的实现基础。
 1
 2
 3
 4
 5
 6
 7
 8
 9
10
11
12
13
14
15
16
17
18
19
20
21
22
| Class.forName("com.mysql.cj.jdbc.Driver");// 加载MySQL JDBC驱动程序
Connection connection = DriverManager.getConnection("jdbc:mysql://localhost:3306/dbname", "username", "password");// 建立连接
Statement statement = connection.createStatement();// 创建Statement对象
// DML 示例:插入数据
int rowsAffected = statement.executeUpdate("INSERT INTO tablename (column1, column2) VALUES ('value1', 'value2');");// 返回受影响的行数
// DQL方式1 通过Statement执行
ResultSet resultSet = statement.executeQuery("SELECT id, name FROM tablename WHERE id = ? AND name = ?;");
// DQL方式2 PreparedStatement 预编译查询
PreparedStatement pStatement = connection.prepareStatement("SELECT id, name FROM tablename WHERE id = ? AND name = ?;");// 预编译sql语句,?表示占位符
pStatement.setInt(1, 1);// 设置第一个占位符的值
pStatement.setString(2, "John");
ResultSet resultSet = pStatement.executeQuery();
while (resultSet.next()) {
String columnValue = resultSet.getString("column_name");// 获取列值
}
resultSet.close();// 关闭ResultSet
statement.close();// 关闭Statement
connection.close();// 关闭Connection
|
MyBatis
通过XML或注解 将SQL语句与Java方法映射,实现对象与数据库之间的映射。
Mybatis中封装查询结果:
- 如果查询返回的字段名与实体的属性名可以直接对应上,用resultType 。
- 如果查询返回的字段名与实体的属性名对应不上,或实体属性比较复杂,可以通过resultMap手动封装 。
 1
 2
 3
 4
 5
 6
 7
 8
 9
10
11
12
13
14
15
16
17
18
19
20
21
22
23
24
25
| <!--自定义结果集ResultMap-->
<resultMap id="empResultMap" type="com.itheima.pojo.Emp">
<id column="id" property="id" />
<result column="name" property="name" />
<result column="dept_id" property="deptId" />
<result column="create_time" property="createTime" />
<result column="update_time" property="updateTime" />
<!--封装工作经历exprList-->
<collection property="exprList" ofType="com.itheima.pojo.EmpExpr">
<id column="exp_id" property="id"/>
<result column="exp_company" property="company"/>
<result column="exp_empid" property="empId"/>
</collection>
</resultMap>
<!--根据ID查询信息,查询结果封装指向自定义结果集-->
<select id="getById" resultMap="empResultMap">
select e.*,
exp.id exp_id,
exp.emp_id exp_empid,
exp.company exp_company
from emp e left join emp_expr exp on e.id = exp.emp_id
where e.id = #{id}
</select>
|
持久层接口
1
2
3
4
5
6
7
8
| @Mapper // 标记为MyBatis的Mapper接口
public interface UserMapper {// 命名为XxxMapper
@Select("SELECT * FROM users WHERE id = #{id}") // 使用注解方式定义SQL
User getUserById(int id);
@Insert("INSERT INTO users (username, email) VALUES (#{username}, #{email})")
void insertUser(User user);
}
|
数据操作
 1
 2
 3
 4
 5
 6
 7
 8
 9
10
11
12
13
14
15
16
17
18
19
20
21
22
23
24
25
26
| // 类定义
@Mapper
public interface UserMapper {
@Select("SELECT * FROM users WHERE id = #{id}")
public User getUserById(int id);// 根据ID查询用户
@Insert("INSERT INTO users (username, email) VALUES (#{username}, #{email})")
public void insertUser(User user);// 增加用户
@Delete("DELETE FROM users WHERE id = #{id}")
public void deleteUser(int id);// 删除用户
@Update("UPDATE users SET email = #{email} WHERE id = #{id}")
public void updateUser(@Param("id") int id, String email);// 更新用户邮箱
// 非官方骨架中,若有多个形参需要使用@Param注解指定参数名与sql语句对应
}
// 使用示例
@Autowired
private UserMapper userMapper;
public void exampleUsage() {
User user = userMapper.getUserById(1);// 查询用户
userMapper.insertUser(new User("newUser", "newuser@example.com"));// 增
userMapper.deleteUser(2);// 删
userMapper.updateUser(3, "updated@example.com");// 改
}
|
多表关系
外键约束(物理)
- 创建外键:
ALTER TABLE 子表名 ADD CONSTRAINT 外键名 FOREIGN KEY (column_name) REFERENCES 父表名(parent_column);
建表时创建:[CONSTRAINT] 外键名 FOREIGN KEY (column_name) REFERENCES 父表名(parent_column),应位于表定义的最后。 - 删除外键:
ALTER TABLE 子表名 DROP FOREIGN KEY 外键名;
多对多关系
通过建立第三张中间表,中间表至少包含两个外键,分别关联两方主键。
 1
 2
 3
 4
 5
 6
 7
 8
 9
10
11
12
13
14
15
| CREATE TABLE students (
id INT PRIMARY KEY AUTO_INCREMENT,
name VARCHAR(100) NOT NULL
);
CREATE TABLE courses (
id INT PRIMARY KEY AUTO_INCREMENT,
title VARCHAR(100) NOT NULL
);
CREATE TABLE student_courses (
student_id INT,
course_id INT,
PRIMARY KEY (student_id, course_id),
FOREIGN KEY (student_id) REFERENCES students(id),
FOREIGN KEY (course_id) REFERENCES courses(id)
);
|
多表查询
内连接
查询多表中交集部分的记录,即满足连接条件的记录。
1
| SELECT 字段列表 FROM 表1 [INNER] JOIN 表2 ON 连接条件 ... ;
|
- 一对一:
SELECT * FROM table1 JOIN table2 ON table1.id = table2.id; - 一对多:
SELECT * FROM table1 JOIN table2 ON table1.id = table2.table1_id; - 多对多:
SELECT * FROM table1 JOIN table2 ON table1.id = table2.table1_id JOIN table3 ON table2.table3_id = table3.id;
外连接
查询多表中交集部分及非交集部分的记录。
- 左外连接(LEFT JOIN):返回左表的所有记录及右表中匹配的记录
1
| SELECT 字段列表 FROM 表1 LEFT JOIN 表2 ON 连接条件 ... ;
|
- 右外连接(RIGHT JOIN):返回右表的所有记录及左表中匹配的记录
1
| SELECT 字段列表 FROM 表1 RIGHT JOIN 表2 ON 连接条件 ... ;
|
子查询
在一个查询语句中嵌套另一个查询语句。
示例
 1
 2
 3
 4
 5
 6
 7
 8
 9
10
11
12
13
14
| SELECT 字段列表 FROM 表名 WHERE 列名 OPERATOR (子查询);
-- 示例:查询所有选修了课程ID为1的学生
SELECT * FROM students WHERE id IN (SELECT student_id FROM student_courses WHERE course_id = 1);
-- 查询每个部门中薪资最高的员工信息
SELECT * FROM emp e, (SELECT dept_id, MAX(salary) max_sal FROM emp GROUP BY dept_id) x WHERE e.dept_id = x.dept_id AND e.salary = x.max_sal;
-- 查询员工所属部门名称及员工人数超过10人的部门名称,e.dept_id = d.id用于约束两表的连接关系
SELECT d.name FROM emp AS e, dept AS d WHERE e.dept_id = d.id GROUP BY d.name HAVING COUNT(*) > 10;
-- 查询工资 低于本部门平均工资 的员工信息 。
SELECT e.* FROM emp e, (SELECT dept_id, AVG(salary) avg_sal FROM emp GROUP BY dept_id) AS x
WHERE e.dept_id = x.dept_id AND e.salary < x.avg_sal;
|
优化
- 实体类传递参数,避免逐个参数传递
 1
 2
 3
 4
 5
 6
 7
 8
 9
10
11
| public class EmpQuery {
private String name;
private Integer gender;
private Date begin;
private Date end;
// 省略getter和setter
}
@Mapper
public interface EmpMapper {
List<Emp> list(EmpQuery empQuery);// 会自动将empQuery对象的属性映射到SQL语句中的参数(名称需要一致)
}
|
- 动态SQL
 1
 2
 3
 4
 5
 6
 7
 8
 9
10
11
12
13
14
15
16
17
18
19
| <!DOCTYPE mapper
PUBLIC "-//mybatis.org//DTD Mapper 3.0//EN"
"http://mybatis.org/dtd/mybatis-3-mapper.dtd">
<mapper namespace="com.itheima.mapper.EmpMapper">
<select id="list" resultType="com.itheima.pojo.Emp">
select e.*, d.name deptName from emp as e left join dept as d on e.dept_id = d.id
<where>
<if test="name != null and name != ''">
e.name like concat('%',#{name},'%')
</if>
<if test="gender != null">
and e.gender = #{gender}
</if>
<if test="begin != null and end != null">
and e.entry_date between #{begin} and #{end}
</if>
</where>
</select>
</mapper>
|
:条件成立则进行拼接。
:根据查询条件生成where关键字,并会自动去除条件前面多余的and或or(若不去除,则无name,有gender时会多出一个and)
事务管理
事务(Transaction)是一组操作的集合,这些操作要么全部成功,要么全部失败,保持数据的一致性和完整性。事务具有四个基本特性,简称为ACID特性:
- 原子性(Atomicity):事务中的所有操作要么全部完成,要么全部不完成。
- 一致性(Consistency):事务执行前后,数据库必须保持一致的状态。执行中可能会有中间状态,但最终不论成败都会回到一致性状态。
- 隔离性(Isolation):并发执行的事务之间相互隔离,互不干扰。
- 持久性(Durability):一旦事务提交,其结果是永久性的,即使系统崩溃也不会丢失。
MySQL的事务默认是自动提交的。当执行一条DML语句,MySQL会立即隐式的提交事务。
使用方式
- SQL
 1
 2
 3
 4
 5
 6
 7
 8
 9
10
| -- 开启事务
start transaction; / begin;
-- 1. 保存员工基本信息
insert into emp values (39, 'Tom', '123456', '汤姆', 1, '13300001111', 1, 4000, '1.jpg', '2023-11-01', 1, now(), now());
-- 2. 保存员工的工作经历信息
insert into emp_expr(emp_id, begin, end, company, job) values (39,'2019-01-01', '2020-01-01', '百度', '开发'), (39,'2020-01-10', '2022-02-01', '阿里', '架构');
-- 提交事务(全部成功)
commit;
-- 回滚事务(有一个失败)
rollback;
|
- @Transactional 注解:在当前方法(类、接口)执行之前开启事务,方法执行完毕之后提交事务,若执行出现异常则回滚事务。
- 默认情况下,只有出现RuntimeException(运行时异常)才会回滚事务。
- 当抛出 Exception(编译时异常)或其子类时默认不回滚,除非手动配置 @Transactional(rollbackFor = Exception.class)
- 事务的传播行为
- REQUIRED(默认):如果已存在事务,则加入;如果没有,则创建新事务。
- REQUIRES_NEW:无论有无,总是创建新事务;如果存在事务,则将当前事务挂起
登录认证
本质是根据用户名和密码查询员工信息。
HTTP协议是无状态协议,每次请求都是独立的,服务器不会自动记住用户的登录状态。因此需要在每次请求时都进行登录校验。
常见的登录校验方法有:
会话技术:
- Cookie
- Session
- Token
统一拦截: 通过拦截器统一处理登录校验逻辑,简化代码重复性,提高可维护性。
- 过滤器(Filter)
- 拦截器(Interceptor)
会话技术
- Cookie
- 客户端存储少量数据(如Session ID),每次请求时浏览器会自动携带Cookie信息。
客户端第一次请求服务器时,服务器自动创建一个Cookie,并将其发送给客户端浏览器。
浏览器会将Cookie保存下来,并在后续的每次请求中自动携带该Cookie信息发送给服务器。
HTTP 协议提供了一个响应头和请求头:
- 响应头 Set-Cookie :设置Cookie S->C
- 请求头 Cookie:携带Cookie C->S
特点:
- HTTP原生支持
- 安全性较低,能在客户端被篡改
- 不能跨域
- 无法在移动端使用
- Session(会话)
- 服务器端存储用户的登录状态信息,每个用户对应一个Session对象。
当客户端第一次请求服务器时,服务器会创建一个Session对象,并生成一个唯一的Session ID。
服务器将Session ID通过Cookie发送给客户端,客户端在后续请求中携带该Cookie信息。服务器通过Session ID识别用户的登录状态。
特点:
- 集群环境下,Session信息需要共享,增加复杂性
- 底层基于Cookie实现,存在相同的安全性问题,只是将数据存储在服务器端相对安全
- Token(令牌)
- 客户端在登录成功后,服务器生成一个唯一的令牌,并将其返回给客户端。
客户端后续请求的请求头中需包含令牌,服务器通过校验令牌的有效性识别登录状态。
特点:
- 无状态,适合分布式系统
- 支持移动端
- 支持跨域
- 但校验算法需要自行设计
JWT(JSON Web Token)
对原始的json数据格式进行安全的封装。
特点:
- 简洁:是一个简单的字符串(经过BASE64编码)。可以在请求参数或者是请求头当中直接传递。
- 自包含:可以根据需求在jwt令牌中存储自定义的数据内容。
结构:
- 头部(Header):包含令牌的类型和签名算法
- 载荷(Payload):包含声明(Claims),即存储的数据
- 签名(Signature):用于验证令牌的完整性和真实性
统一拦截
- 过滤器(Filter)
过滤器是 JavaWeb三大组件(Servlet、Filter、Listener)之一。
需要在项目启动类上添加注解 @ServletComponentScan 开启SpringBoot项目对于Servlet组件的支持。
 1
 2
 3
 4
 5
 6
 7
 8
 9
10
11
12
13
14
15
16
17
| @WebFilter(urlPatterns = "/*") // 配置过滤器拦截的请求路径
public class DemoFilter implements Filter {
//初始化方法, web服务器启动, 创建Filter实例时调用, 只调用一次
public void init(FilterConfig filterConfig) throws ServletException {
System.out.println("init ...");
}
//拦截方法,可以调用多次
public void doFilter(ServletRequest servletRequest, ServletResponse servletResponse, FilterChain chain) throws IOException, ServletException {
System.out.println("放行前逻辑.....");
filterChain.doFilter(servletRequest,servletResponse);// 放行方法
System.out.println("放行后逻辑.....");// 访问完资源还会回到过滤器中
}
//销毁方法, web服务器关闭时调用, 只调用一次
public void destroy() {
System.out.println("destroy ... ");
}
}
|
过滤器链的执行顺序:对于通过注解配置的Filter,优先级是过滤器类名的自然排序。
- 拦截器(Interceptor)
拦截器是 Spring MVC 提供的一种机制,用于在请求处理之前和之后执行特定的逻辑。
 1
 2
 3
 4
 5
 6
 7
 8
 9
10
11
12
13
14
15
16
17
18
19
20
21
22
23
| //自定义拦截器,托管给Spring容器管理
@Component
public class DemoInterceptor implements HandlerInterceptor {
//目标资源方法执行前执行
@Override
public boolean preHandle(HttpServletRequest request, HttpServletResponse response, Object handler) throws Exception {
System.out.println("preHandle .... ");
return true; //true表示放行;返回false:不放行
}
//目标资源方法执行后执行
@Override
public void postHandle(HttpServletRequest request, HttpServletResponse response, Object handler, ModelAndView modelAndView) throws Exception {
System.out.println("postHandle ... ");
}
//渲染完毕后执行,最后执行
@Override
public void afterCompletion(HttpServletRequest request, HttpServletResponse response, Object handler, Exception ex) throws Exception {
System.out.println("afterCompletion .... ");
}
}
|
获取当前登录用户的信息
- 通过Filter或Interceptor拦截请求后,如何将请求头中信息传递给业务逻辑层?
在同一个线程/同一个请求中,使用ThreadLocal进行数据共享。
 1
 2
 3
 4
 5
 6
 7
 8
 9
10
11
12
13
14
15
16
17
18
19
20
21
22
23
24
25
26
27
28
29
| public class LocalContent {
// 创建ThreadLocal对象,用于存储当前请求的信息
private static final ThreadLocal<Integer> CURRENT_LOCAL = new ThreadLocal<>();
// 记录、读取信息的方法
public static void setCurrentId(Integer employeeId) {
CURRENT_LOCAL.set(employeeId);
}
public static Integer getCurrentId() {
return CURRENT_LOCAL.get();
}
public static void remove() {
CURRENT_LOCAL.remove();
}
}
// 在拦截器中使用
@Slf4j
@WebFilter(urlPatterns = "/*")
public class TokenFilter implements Filter {
// ...
// 获取请求头并解析得到employeeId后
LocalContent.setCurrentId(employeeId);// 记录数据
filterChain.doFilter(servletRequest, servletResponse);// 放行
LocalContent.remove();// 请求处理完毕,移除数据
}
// 在业务逻辑层使用
Integer employeeId = LocalContent.getCurrentId();// 读取数据
|
AOP(面向切面编程)
通俗的理解:将与业务无关的代码(如日志记录、权限校验、事务管理等)从业务逻辑中分离出来,在运行时无侵入地实现动态代理,从而实现代码的模块化和复用。
核心概念
- 连接点(Join Point):程序执行中的特定点,即方法、异常等。
- 切入点(PointCut):用规则或表达式限定操作连接点的范围。
- 通知(Advice):在连接点上执行的操作,如前置通知、后置通知、环绕通知等。
- 切面(Aspect):即通知+切入点。模块化的关注,如日志记录、事务管理等。
 1
 2
 3
 4
 5
 6
 7
 8
 9
10
11
12
13
14
15
16
17
18
| @Component //托管给Spring容器管理,才能识别到切面注解
@Aspect //标记为切面类
@Slf4j
public class RecordTimeAspect {
@Around("execution(* com.hych.service.impl.DeptServiceImpl.*(..))")// 围绕通知,指定切入点表达式
public Object recordTime(ProceedingJoinPoint pjp) throws Throwable {
//记录方法执行开始时间
long begin = System.currentTimeMillis();
//执行原始方法
Object result = pjp.proceed();
//记录方法执行结束时间
long end = System.currentTimeMillis();
//计算方法执行耗时
log.info("方法执行耗时: {}毫秒",end-begin);
return result;
}
}
|
@Aspect 注解表示该类是一个切面类。
@Around 注解表示环绕通知,可以在方法执行前后添加自定义逻辑。
execution(* com.hych.service.impl.DeptServiceImpl.*(..)) 表示切入点表达式,匹配 DeptServiceImpl 类中的所有方法。
pjp 为要操作的目标对象。
pjp.proceed() 执行目标对象中被AOP控制的方法,即连接点。
通知类型
@Around:环绕通知,在方法执行前后执行。若pjp.proceed()方法抛出异常,则后续通知逻辑不再执行。
@Before:前置通知,在方法执行前执行。
@After:后置通知,在方法执行后执行(无论方法是否成功完成)。
@AfterReturning:返回通知,在方法成功执行后执行,有异常不执行。
@AfterThrowing:异常通知,在方法抛出异常后执行。
1
2
3
4
5
| // 除了around,其余四种通知使用格式(调用对象为jp而非pjp)
@Before("execution(* com.itheima.service.*.*(..))")
public void before(JoinPoint joinPoint){// JoinPoint类是ProceedingJoinPoint的父类
log.info("before ...");
}
|
- 不同切面类中通知执行顺序:
对于Before,切面类字母排名靠前的先执行;对于After,切面类字母排名靠前的后执行。
可通过@Order(Integer)注解指定顺序,按数字顺序规则同上。
 1
 2
 3
 4
 5
 6
 7
 8
 9
10
11
12
13
14
15
| @Slf4j
@Component
@Aspect
public class MyAspect1 {
//前置通知
@Before
public void before(JoinPoint joinPoint){log.info("MyAspect1 -> before ...");}
//后置通知
@After
public void after(JoinPoint joinPoint){log.info("MyAspect1 -> after ...");}
}
// MyAspect2 ...
// MyAspect3 ...
|
前置通知执行顺序:MyAspect1 -> MyAspect2 -> MyAspect3
后置通知执行顺序:MyAspect3 -> MyAspect2 -> MyAspect1
切入点表达式
- execution
格式:
1
| execution([访问修饰符] 返回值 [包名.类名.]方法名(方法参数) [throws 异常])
|
通配符:
*:匹配任意单个符号(类名、方法名、返回值类型),也可以通配名称的一部分(如find*可匹配 findByID)..:匹配任意数量的参数(包括0个参数)
可使用 && ,||,!组合复杂的切入点表达式。
- annotation
匹配标注了指定注解的方法或类。
可在选为连接点的方法上添加自定义注解。